Expense Tracking in Home Lab

Whats and Whys
I wrote a tool called Budgeter for one straightforward reason - to track expenses. There are so so so so many tools out there that do the same. And they do it so well, with so many features. What I wrote is too simple, so why not just use one of the existing tools? I was using one too! I preferred Spendee but migrated from it for two reasons → I wanted something for my home server and something that does exactly what I want.
Budgeter is primarily a simple API-based service to which I can add data using POST requests. I wanted data addition to be very quick, so making it a simple POST request allows me to add data through a Siri Shortcut, which also doubles as a friendly UI to add data. I can also create custom graphs in whatever way with precisely the type of analysis I want to do (PS: I still have yet to write the analysis part, but I don’t analyze that often, so it’s okay). Lastly, I wanted to do it without adding unnecessary details (unless needed). This is because, generally, the analysis that matters contains what we’re spending on and when. For example, “I spent 200$ last week on food, but a total of 300$ in the last month on food” is more important than “I had cheesecake factory 3 times in the last week”. This means skipping the notes, tags, etc., and sticking to 2 things - category and amount. I also don’t need to maintain my entire net worth on an app by tracking income because income trickles in regularly, and I can monitor that through emails. Monitoring trends rather than specifics is essential, so I decided to store monthly data in JSON to make it easily readable and plottable.
Another reason for getting out of third-party apps is to reduce tracking and service vendor lock-in. I appreciate the hard work of app developers and hope they get funded for their work, but at the same time, if I can write code in some capacity, why commit to another app unnecessarily when it’s more interesting and this way? The vendor locking thing shows up in random places for different apps; for example, I couldn’t export my expense data older than a year without a premium subscription….. 🤔 ??? it’s my data……!!! 🙄
Deployment
Here is a one-liner deployment command →
1
2
mkdir -p $HOME/expense-data; docker run -v $HOME/expense-data/:/expense-data --name budgeter --rm -p 80:5000 -d -t tanq16/budgeter:main
# use tag :main_arm for ARM64 image
After this, the container will be deployed at localhost:80. A better way to deploy it is using docker-compose either directly or through Portainer. Create a volume for it with mkdir -p $HOME/expense-data and use this stack definition for Portainer →
1
2
3
4
5
6
7
8
9
10
11
12
services:
  budgeter:
    image: tanq16/budgeter:main
    container_name: budgeter
    networks:
      - servicesnet
    volumes:
      - /home/username/budgeter:/expense-data # replace with correct path
    ports:
      - 5002:5000
networks:
  servicesnet:
Backing Up
Backups are another piece of the puzzle. I’m doing manual backups for my home lab server, so this data is included automatically. Still, you can easily set up rsync for backing up to local NAS or other more sophisticated backup utilities triggered via cron jobs. In the spirit of automating everything, you could also use Dropbox API and Python in a script triggered by cron jobs to make a tarball from the expense data and back that single file to the cloud (I have yet to attempt this one).
Migration
I migrated from Spendee after exporting a CSV from the service. Custom scripts are required for different types of exports. For Spendee, I used this code →
1
2
3
4
5
6
7
8
9
10
11
12
13
14
15
16
17
18
19
20
21
22
23
24
25
26
27
28
29
30
31
32
33
34
35
36
37
38
39
40
41
import csv
import json
from datetime import datetime

# Define a dictionary to map category names to actual values
category_mapping = {
    "Credit Card Offer": "ignore", "Food & Drink": "food", "Miscellaneous ": "personal",
    "Car/Cab": "travel", "Family": "family", "Groceries": "groceries", "Healthcare": "personal",
    "Home": "home", "Investments": "investing", "Miscellaneous": "personal", "Personal": "personal",
    "Refunds": "ignore", "Salary": "ignore", "Shopping": "shopping", "Subscriptions": "subscriptions",
    "Transport": "travel", "Travel": "travel"
}

def preprocess_data(row):
    amount = -float(row["Amount"])
    category = category_mapping.get(row["Category name"], row["Category name"].lower())
    reduced_date = datetime.strptime(row["Date"], "%Y-%m-%dT%H:%M:%S+00:00").strftime("%d-%m-%Y")
    return {
        "date": reduced_date,
        "category": category,
        "amount": amount,
        "note": row["Note"]
    }

final = {}
with open('transactions.csv', 'r') as csvfile:
    reader = csv.DictReader(csvfile, delimiter=',')
    for row in reader:
        processed_data = preprocess_data(row)
        month_year = processed_data["date"][3:10]
        if processed_data["category"] == "ignore":
            continue
        if processed_data["amount"] < 0:
            continue
        if not month_year in final:
            final[month_year] = []
        final[month_year].append(processed_data)

for i in final:
    with open(i + "-expenses.json", 'w') as jsonfile:
        json.dump(final[i], jsonfile, indent=4)
For any other platform, try to get CSV export ready and modify the fields directly in the CSV to match those of the above script or modify the script to match the export data.
Setting up a Siri Shortcut
A Siri Shortcut can be set with the following parameters to enable adding expenses via the API →
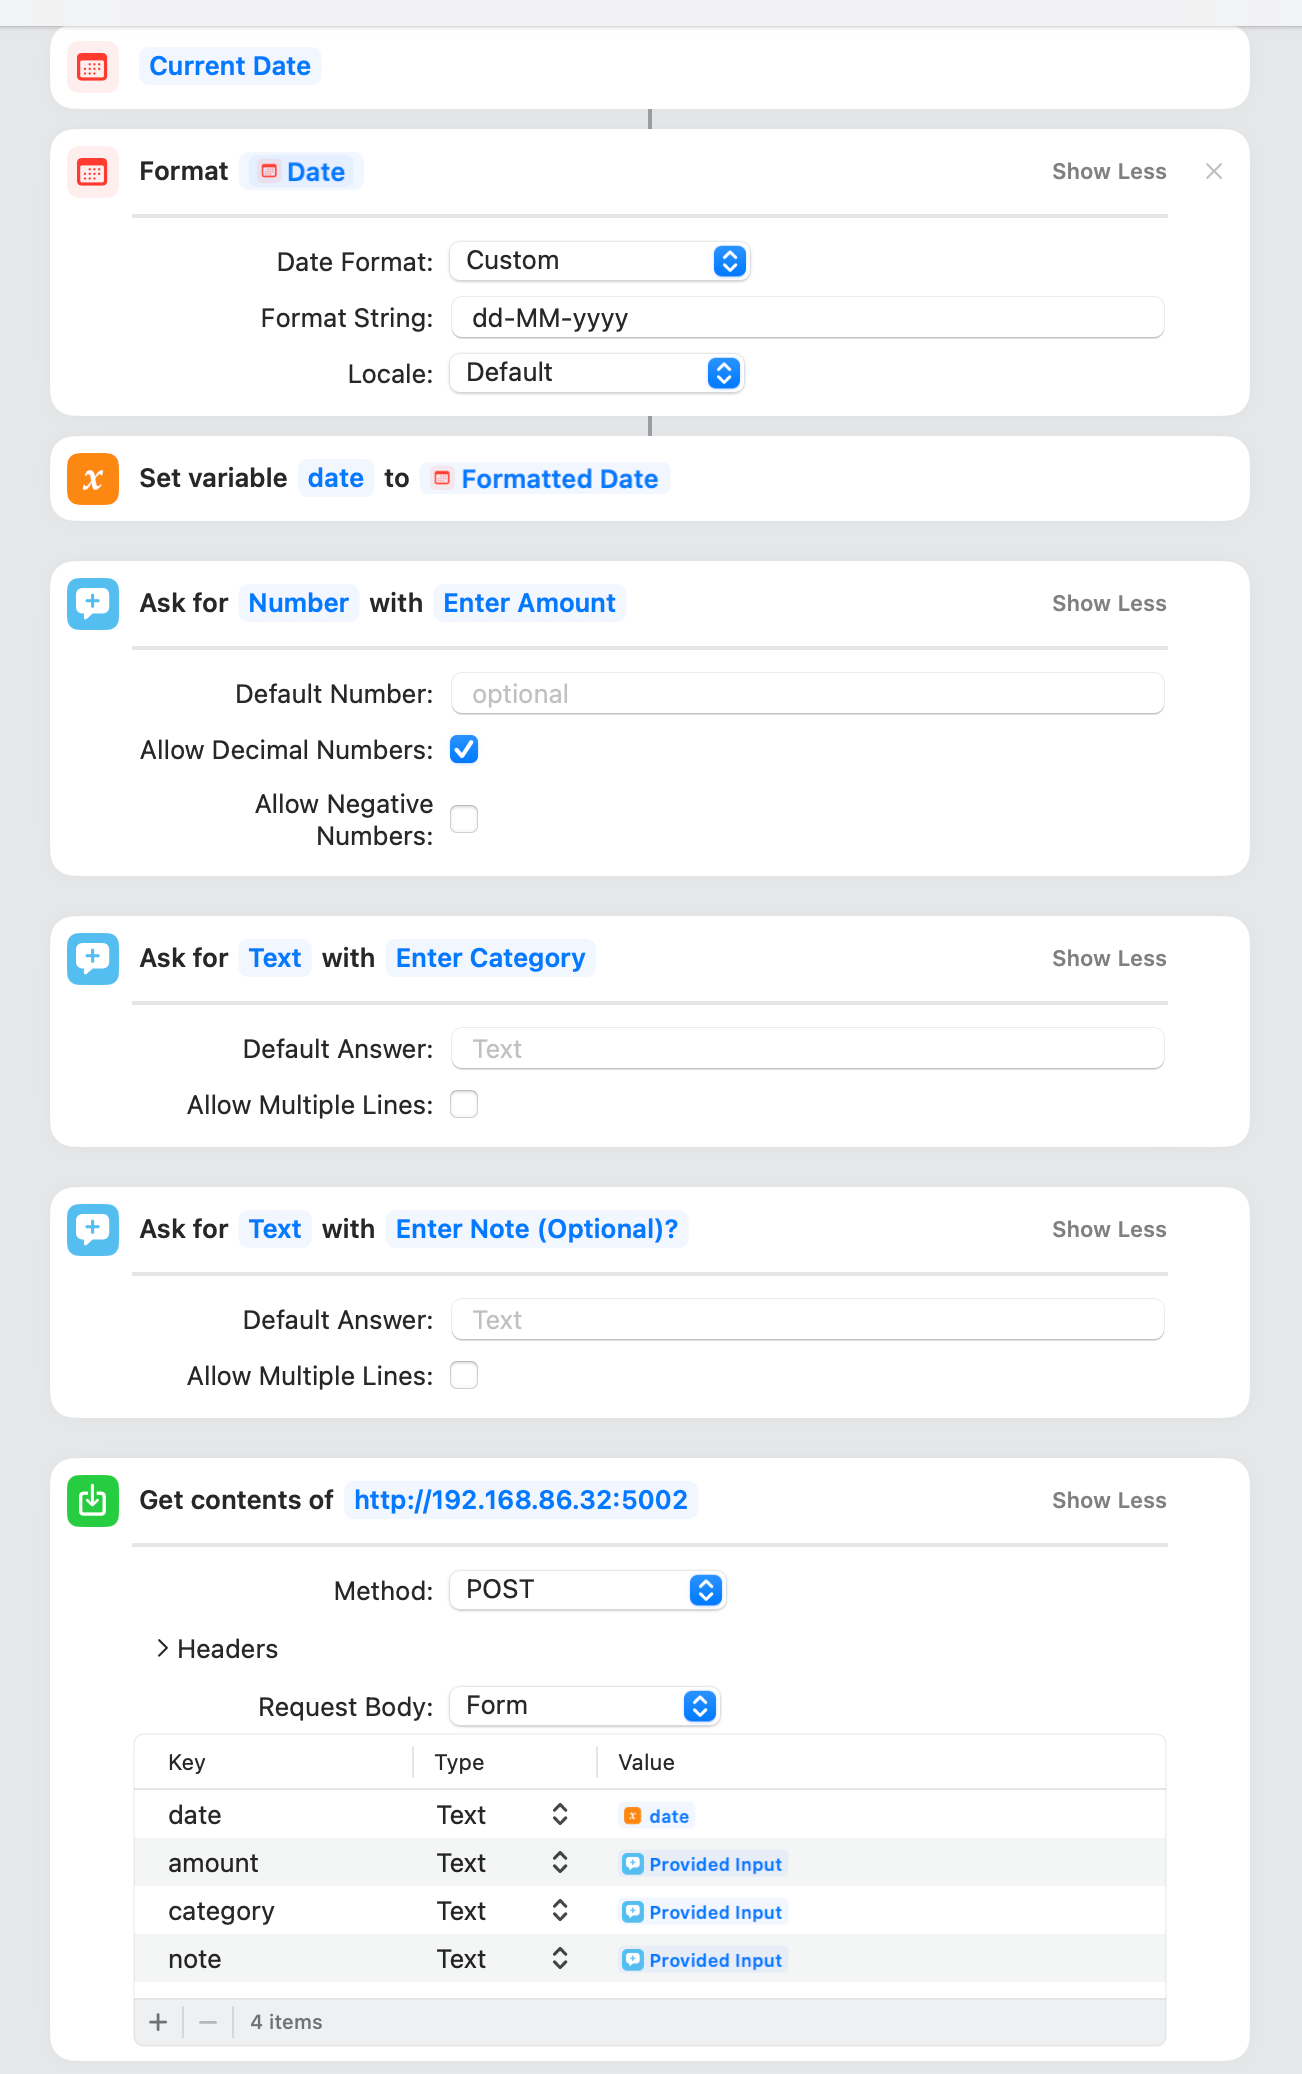
For the iPhone, the Shortcut can be added to the home screen as a bookmark, so it becomes a trigger such that as soon as it is clicked, it launches the interface to record the expense.